Mobile Enterprise Services
HELP
Expand All | Retract All

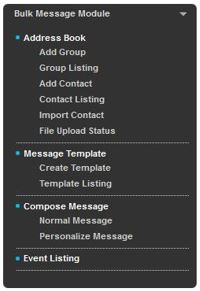
"Bulk Message Module" is a mandatory module of the MES GUI system. This module is applicable for both SMS and MMS.
Fig 3.0-1
An "Address Book" is to manage individual or group mobile subscriber's contact information. It allows you to import external contacts into the address book.
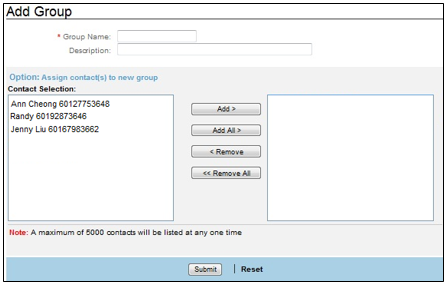
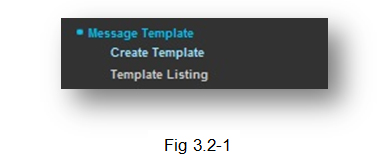
3.1.1 Add Group

A new group can be created based on similar characteristics such as demographic identities, employer or even work location. Messages can be sent to this pre-defined group immediately without the hassle of choosing the contacts one by one.
Fig 3.1.1-1
1. Enter a "Group Name".
- "Group Name" is a mandatory field.
- Only Roman and Unicode characters are allowed.
- Space, Underscore "_" and dash "-" are allowed.
- Maximum length: 20 characters.
- Group Name MUST be unique.
2. Enter a "Description" that best describes the Group Name.
- Only Roman and Unicode characters are allowed.
- Maximum length: 50 alphanumeric characters inclusive space.
3. Select the respective Contacts from the Address Book.
- Click "Add" to add the selected contacts.
- To select multiple-selection at one time, hold the CTRL key, and select multiple contacts with the cursor.
- Click "Submit" to confirm the setting, or click "Reset" to clear the input/setting on the current page.
.
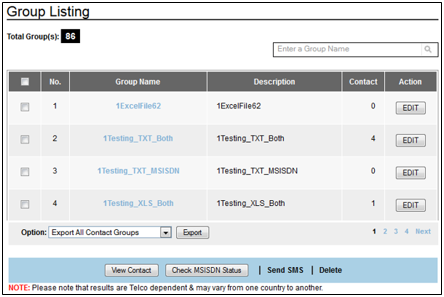
3.1.2 Group Listing
"Group Listing" allows you to view the lists of groups which you have created. You also have the option to edit each group’s list.
Fig 3.1.2-1
View Contact
- Click on "View Contact" to display the complete contact details that have been stored in the contact address book.
Search
- Enter the first alphabet of the group name to run a quick search on the respective record. You will be prompted to the first record that begins with that alphabet.
- Partial and full term search options are available.
- Accepted input: Roman and Unicode characters.
Check MSISDN Status
- This is an optional function. You can use this to check if the mobile number is active/inactive/roaming etc. By ticking this button for a particular mobile number, a few functions such as porting status, roaming country and roaming network are displayed.
Refer to Table 2.1.2.3-1 in Reporting Log module for the definition of each function.
- Tick in the checkbox of the selected record/records.
- Then click "Check MSISDN Status". Refer to Section 2.1.2.3 Network Query Log to check how to operate the "Check MSISDN Status". Note that only successful results will be logged in the "Network Query Log". Failed results will be logged in the "Rejected Log".
- Credits will be deducted for every mobile number.
Edit
Add/remove contacts or even modify your Group Name and Group Description
- Select the check box of the respective record/records.
- Click ‘Edit’.
- Modify the "Group Name" & "Description" or add/remove contacts from the ‘Contact Selection’ Box.
- Click "Update" to confirm the setting, or click "Back" to cancel the action and return to previous page.
Export
This feature allows you to export either the entire contact list information of the group or only selected mobile numbers.
- Click "View Contact" to view group contact details, and decide whether to export all or some of the contact details.
- Select "Export All Contact Group" to export the entire group contacts from the database, or select "Export Selected Contact" to export the selected group contacts from the database.
- If you only want to export selected mobile numbers, please check the selected numbers. Then select "Export Selected Numbers" and click "Export".
- Finally "Save" the information to your hard drive.
Delete
You are allowed to delete groups and contacts.
- Select the check box of the respective groups.
- Click “Delete”.
- A "Delete Contact" confirmation box is displayed.
- Click YES to remove the selected group's contact record, entirely from all available groups and address book OR
- Click NO to remove the contact record from selected groups, but remain available in other groups or and address book OR
- Click Cancel to cancel the action.
Send SMS
- Click "Send SMS" to send message to selected contacts from the list.
- A maximum of 30 contacts are recommended for multiple contacts selection.
- Fill in the respective fields.
- From
- To
- Scheduler
- Message
- Click "Submit" to confirm the setting, or click “Reset” to clear the input/setting on the current page.
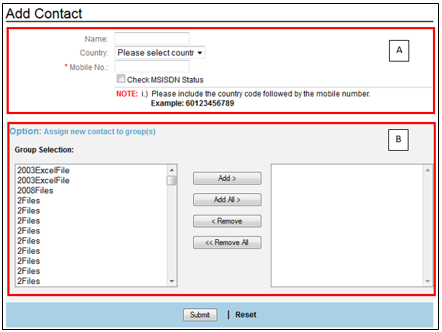
3.1.3 Add Contact
“Add Contact” allows you to perform 2 functions. The 1st is to add a new contact into the Contact List and the 2nd is the option to add this contact into an existing group. The 1st function is done in Section A, while the 2nd function is done in Section B.
You can opt to add a new contact without listing this contact into any group.
Fig 3.1.3-1
- This is an optional field.
- Accepted input: Roman and Unicode characters.
- This is a mandatory field.
- Special symbols such as “*”, “-“, “+” and blank space are not allowed.
- To do multiple-selection, hold the CTRL key to select multiple contacts at one time.
- Enter the first alphabet of the group name to run a quick search on the respective record. You will be prompted to the first record that begins with that alphabet.
.
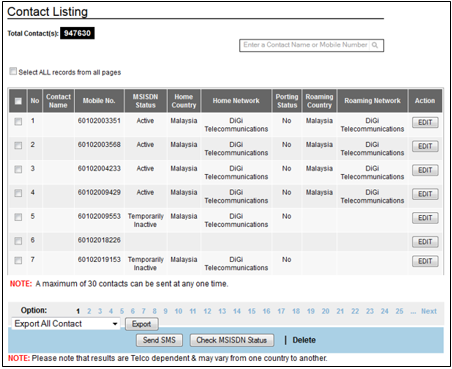
3.1.4 Contact Listing
"Contact Listing" displays the contact records that have been saved.
Fig 3.1.4-1
Search
- Enter the first alphabet of the group name to run a quick search on the respective record. You will be prompted to the first record that begins with that alphabet.
- Partial and full term search options are available.
- Accepted input: Roman and Unicode characters.
Edit
- Select the check box of the respective record or records.
- Click "Edit".
- An "Edit Contact" screen is displayed.
- Edit the following fields:
- Group Name
- Country (respective country code will be populated automatically on the Mobile No. field with response to the selection)
- Mobile No
- Assign or remove contact to/from the group/groups.
- Click "Update" to confirm the setting, or click “Reset” to clear the input/setting on the current page.
Export
- Click "Export All Contact" to export the entire group contact records in the database, or click "Export Selected Contact" to export the selected group contact records in the database.
Send SMS
- Click "Send SMS" to send SMS to selected contacts from the list.
- A maximum of 30 contacts are recommended for multiple contacts selection.
- Fill in the respective fields.
- Click "Submit" to confirm the setting, or click “Reset” to clear the input/setting on the current page.
Check MSISDN Status
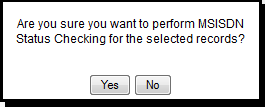
1. This function is to check if the mobile number is in active/inactive/temporarily inactive mode. Tick the checkbox of the respective mobile number. Then click "Check MSISDN Status". Fig 3.1.4-2 will be displayed. Click "Yes".
Fig 3.1.4-2
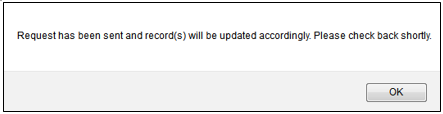
2. A system promt message will be displayed as below:
Fig 3.1.4-3
3. Refresh the page and check the records in "Network Query Log" after a few minutes. Only successful results will be logged into the "Network Query Log". Failed results will be logged into the "Rejected Log".
Delete
You are allowed to delete contacts.
- Select the check box of the respective contacts.
- Click “Delete”.
- A "Delete Contact" confirmation box is displayed.
- Click "YES" to delete or "NO" to cancel the action.
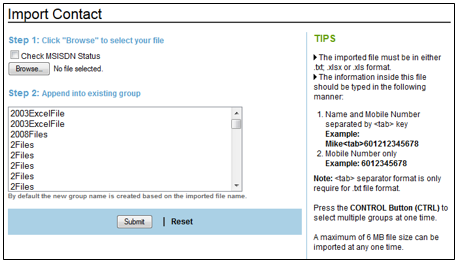
3.1.5 Import Contact
Fig 3.1.5-1
- File must be in .txt format, refer to Appendix "Convert Excel (.csv) to Text (.txt) File".
- The content of the imported file should be in the following format:
- Name<tab>Mobile number
- Mike<tab>60121234567
OR
- Click "Yes" to create a new group.
- Click "No" to add imported contacts into the selected group only.
- A Confirmation Message “File uploaded successfully" will be displayed once the file is uploaded.
.
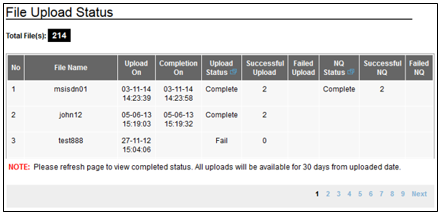
3.1.6 File Upload Status
"File upload Status" displays the upload status of each imported file.
Fig 3.1.6-1
Upload On
- This indicates the date and time of file upload.
Completion On
- This indicates the date and time the file upload was completed.
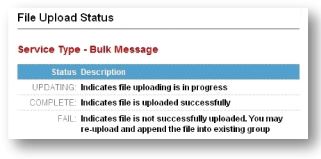
Upload Status
- This indicates the upload status of each imported file. Refer to Fig 3.1.6-2 for description on the statuses.
Fig 3.1.6-2
Successful Upload
- This indicates that the file has been uploaded successfully.
Failed Upload
- This indicates that the file did not upload successfully. You can re-upload and append the file into an existing group.
Notes:
- The system removes any duplicate mobile numbers from the imported file automatically. The removed record(s) will not be reflected in the failed log text file.
- Records in the "File Upload Status" will only be available for ONE month from the date of creation.
- If the latest status is not displayed on the page, click refresh to reload the web page.
- Please refer to the MES upload file validation formats as below:
.Case 1: Length of mobile number should not be less than 1 digit
Case 2: Maximum length of mobile number should not exceed 19 digits per mobile number
Case 3: If the contacts are saved as .txt file format, <Tab> must be used instead or space bar to differentiate between mobile numbers.
e.g. (wrong) Samantha<space> 60123456789
e.g. (correct) Samantha<tab>60123456789Limitation:
(1) The system reads the first parameter as name and the second parameter as mobile number. So if you input both parameters as mobile numbers, the first mobile number will be read as 'contact name'.
e.g. 1st parameter: 60165544337<tab> 2nd parameter: 60162287654
(Explanation: Since the 1st parameter: 60165544337 is a number, it will be read as contact name, only the 2nd parameter: 60162287654 will be read as mobile number).
NQ Status
Processing
Successful NQ
Refers to the number of MSISDN that has been queried.
Failed NQ
Refers to the number of MSISDN that failed to be queried.
Related Link:
Refer to Appendix "Variation - Malaysia" for references on credit deduction with auto price code appended.
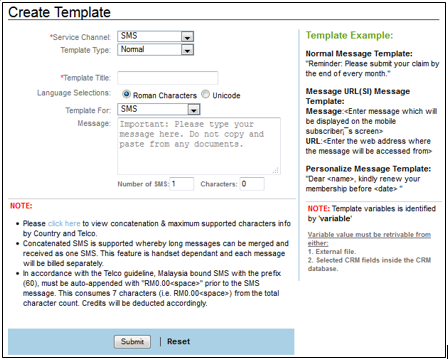
3.2.1 Create Template
You can create a pre-defined Message Template and content for common usage. There are 2 categories of message templates - "Normal" & "Personalized". The created message can be delivered either in SMS or in MMS.
- Normal
- A standard message template, such as promotion or sales event.
- Personalized
- A message template with variables addressing specific users, e.g. user name and mobile number.
Creating Normal Message Template
SMS
Fig 3.2.1-1
- This is a mandatory field
- Maximum length allowed: 30 alphanumeric characters inclusive space.
- Accepted input: Roman and Unicode characters.
- Make sure the template title is unique.
Note: For Malaysian numbers, the total characters allowed for concatenation is 1064 for Roman, while for Unicode is 328 characters. This is after the compulsory deduction of Price Indication and UDH characters. Note: There is No UDH deduction for U Mobile. Only price indication is supported. (Refer to the Table 10.4.4-1).UDH refers to User Data Header. UDH's function is to join messages more than 160 characters long. User Data Header contains information on the message type, the length of a message, concatenation and more.
- Roman characters: Bahasa Melayu / English, etc.
- Unicode characters: Arabic / Simplified Chinese / Traditional Chinese / Japanese / Korean / Gujarat / Thai / Vietnamese, etc.
- Users are allowed to compose messages up to the following characters stated below:
- Roman: 1071
- Unicode: 380
MMS
Fig 3.2.1-2
- This is a mandatory field
- Maximum length allowed: 30 alphanumeric characters inclusive space.
- Accepted input: Roman and Unicode characters.
- Make sure the template title is unique.
- Roman characters: Bahasa Melayu / English, etc.
- Unicode characters: Arabic / Simplified Chinese / Traditional Chinese / Japanese / Korean / Gujarat / Thai / Vietnamese, etc.
- Maximum length: A Maximum of 40 Roman characters (inclusive of space, numeric and special characters) are allowed to be displayed.
- A maximum of 13 Unicode characters are allowed. (inclusive of space, numeric and special characters) are allowed to be displayed.
- Accepted input: Roman and Unicode characters.
Create Personalized Message Template (CRM Type)
- A Personalized template is a formatted message that comes with dynamic variables.
- The created template with variables in the content are later merged with an existing CRM database.
Create Personalized SMS Template
Fig 3.2.1-3
- This is a mandatory field.
- Maximum length allowed: 30 alphanumeric characters inclusive space.
- Accepted input: Roman and Unicode characters.
- Make sure the template title is unique.
- Roman characters: English / Bahasa Melayu, etc.
- Unicode characters: Arabic / Simplified Chinese / Traditional Chinese / Japanese / Korean / Gujarat / Thai / Vietnamese, etc.
- The selected variable field will be reflected inside the message box automatically for "<Field Name>".
- Your Personalized Message Template allows a maximum of 4 concatenated SMS for Roman characters (612 Roman characters). This is excluding the variable text.
- As for Unicode characters, a total of 4 concatenated SMS are allowed (268 Unicode characters). This is excluding the variable text.
Note: For Malaysian numbers, the total characters allowed for concatenation is 605 for Roman, while for Unicode is 261 characters. This is after the compulsory deduction of Price Indication and UDH characters. (Refer to the Appendix 10.4.2 for more information). This is to prevent the final message from exceeding the maximum characters allowed after inserting the specific variables.
- Avoid cut and paste of any special characters, such as: “,+,/,{,}.
- In the Notes section, you can click on "Click here" to check the maximum number of characters allowed per country.
- CRM Template example: " Dear <Contactname>, please be reminded that your loan amount of <Amount> is due within 7 days. Kindly remit payment at the nearest branch.
- <Contactname> and <Amount> is the dynamic variables. This should be column 2 and column 3 of your uploaded file, as first column has to be always reserved for receiver mobile numbers.
- Refer to Appendix "Personalized Message (File Format)" for real case example.
Create Personalized MMS Template
Fig 3.2.1-4
- This is a mandatory field.
- Maximum length allowed: 30 alphanumeric characters inclusive space.
- Accepted input: Roman and Unicode characters.
- Make sure the template title is unique.
- Roman characters: English / Bahasa Melayu, etc.
- Unicode characters: Arabic / Simplified Chinese / Traditional Chinese / Japanese / Korean / Gujarat / Thai / Vietnamese, etc.
- Maximum length: A Maximum of 40 Roman characters (inclusive of space, numeric and special characters) are allowed to be displayed.
- A maximum of 13 Unicode characters are allowed. (inclusive of space, numeric and special characters) are allowed to be displayed.
- Accepted input: Roman and Unicode characters.
- Add in the MMS "Template Title".
- Then upload the multimedia file followed by the MMS text message.
- Please abide by the template format and file size as stated in the ‘Template Example’ on the right side of the web page.
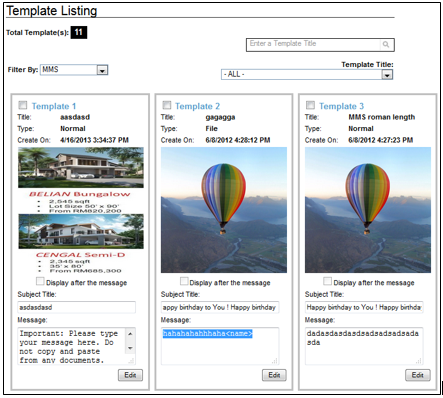
3.2.2 Template Listing
Template Listing displays the records of all the saved templates.
SMS
Search
- Select the "Template Title" to search for the template record from the drop down list.
- You may enter texts in the search field to search for the template.
- Partial and Full text search is allowed in either Roman or Unicode characters.
Filter By
You are allowed to filter by "SMS" or "MMS". The following screenshot will be displayed when you select "MMS".
MMS
Fig 3.2.2-2
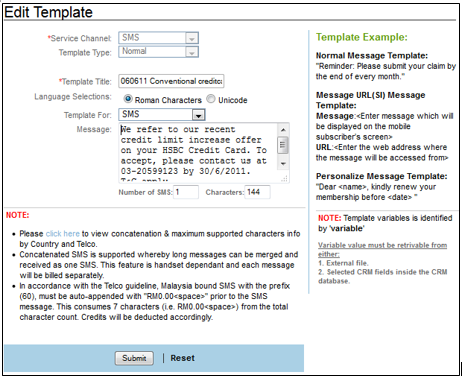
Edit Template
The "Edit" function allows you to edit the template record.
SMS
Fig 3.2.2-3
- Edit the setting of respective fields.
- Click "Submit" to save the setting,or click “Reset” to clear the input/setting on the current page.
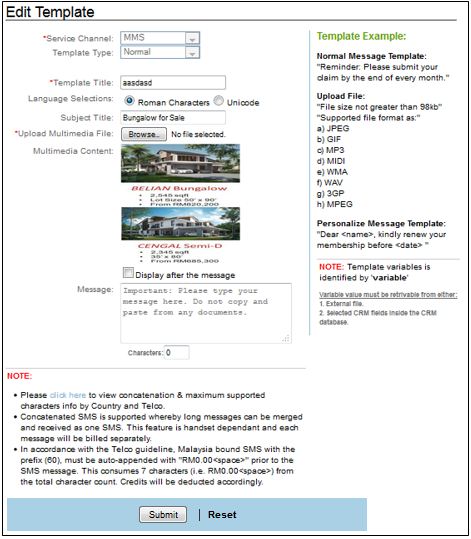
MMS
The same functions are also available for MMS. Tick in the checkbox and select "Edit". Fig 3.2.2-4 will be displayed.
Fig 3.2.2-4
The "Display After Message" checkbox should be ticked if you want the picture to appear after the MMS text message.
Delete
- Select the check box of the selected template, and click "Delete" to remove the selected template.
Related Link:
Refer to Appendix "Variation - Malaysia" for references on credit deduction with auto price code appended.
Note:
Please note that by clicking the "Enter" key, to start a new row, it would take up 2 character counts in MES GUI.Refer to below for special characters:
1.) Symbols ^ { } \ [ ~ ] | € will be counted as 2 characters for Roman messages and 1 character for Unicode Messages.
2.) Symbol € will be auto converted to character E and displayed as E at the receiver’s end.
3.) Symbol ` will be auto converted to symbol ‘ and displayed as ‘ at the receiver’s end.3.3.1 Normal Message
The following are the functions of a "Normal Message".
- You may compose a new message with or without a message template.
- You may perform scheduler setting to set the frequency of sending messages at a predefined date and time.
- Please note that operators in different countries support different types of Sender ID. They are as shown in Table 3.3.1-1. Please ensure compliance with specific Telco/country regulations when broadcasting messages.
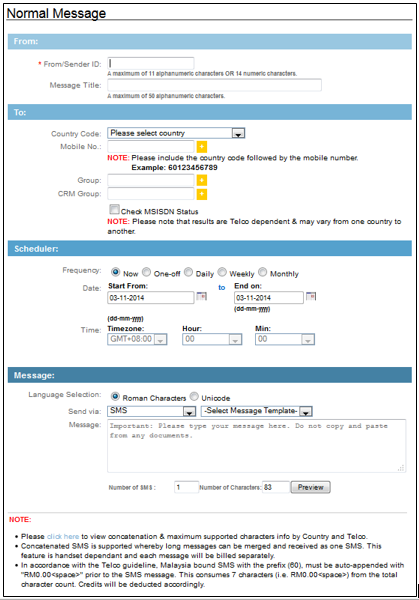
SMS
Fig 3.3.1-1
MMS
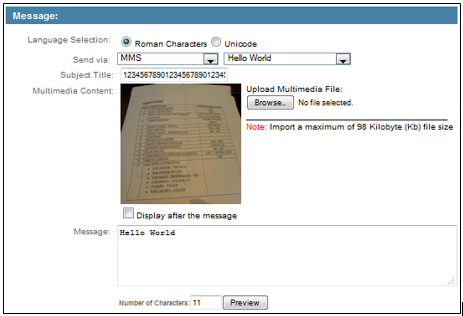
If you select "Send Via: MMS", the "Message" column as shown in Fig 3.3.1-2 is displayed.
Fig 3.3.1-2
- This is a mandatory field.
- A maximum of 11 alphanumeric characters OR 14 numeric digits are allowed for the Sender ID.
- Space is allowed for alphanumeric format only.
- Please note that operators in different countries support different types of Sender ID. They are as shown in Table 3.3.1-1. Please ensure compliance with specific Telco/country regulations when broadcasting messages. As for MMS, please refer to Table 3.3.1-2.

Country |
Sender ID |
|||||||||||||||||||
Malaysia |
|
|||||||||||||||||||
Singapore |
|
|||||||||||||||||||
China |
|
|||||||||||||||||||
Indonesia |
|
|||||||||||||||||||
Thailand |
|
|||||||||||||||||||
UAE |
|
|||||||||||||||||||
Vietnam |
|
|||||||||||||||||||
India |
|
|||||||||||||||||||
Philippines |
|
|||||||||||||||||||
Turkey |
|
|||||||||||||||||||
Taiwan |
|
|||||||||||||||||||
Africa |
|
|||||||||||||||||||
Others |
|
Table 3.3.1-1
Glossary for Table 3.3.1-1
Sender ID Types |
Definition |
Fixed Sender ID |
A Sender ID which is a fixed set of characters provided by the Telco to clients.This Sender ID will be same for all messages being broadcasted by that Telco for that particular company. But it may differ for a different company.It may include only shortcode, alphabets, numerics or alphanumerics. |
Dynamic Sender ID |
A Sender ID which is not tied to any particular characters.This Sender ID will not be same for all messages being broadcasted. It is a dynamic input which is either inserted by the client broadcasting the message (“Free Input”) or randomly assigned by the Telco (“Random Sender ID”).It may include only alphabets, numerics or alphanumerics. |
Sender ID Registration |
Clients are allowed to broadcast messages with their own branding by registering the Sender ID of their choice with Telco. This registered Sender ID will be subject to Telco approval.If the client does not register for a Sender ID, the Telco sets a Default Sender ID for them. |
Promotional Messages |
Promotional Message means messages containing promotional material or advertisement of a product/service via Text SMS or Voice. |
Transactional Messages |
“Transactional message” means an SMS containing only— |
Table 3.3.1-2
2.The Message Title field in the "Compose Message" module allows the display of up to 50 characters inclusive of space.
3. Select the respective Country Code. Selected country code will be automatically reflected in the "Mobile No." field automatically.
4. Define recipients: "Mobile Number", "Group", or "CRM Group".
- Special characters are not permitted, such as: *, -, +, Space
a) Mobile Number - Enter recipient's mobile number manually in the format of either:
- Country Code + Mobile No. (e.g.:60123336676) or
- Select the mobile number from the list (multi selection is possible).
b) Group: Select recipients from the Group Address Book (multi group selection is possible).
- Maximum input: 30 groups
c) CRM Group: Select recipients from the CRM Group.
d) Check MSISDN Status
- This function is to check if the mobile number is in active/inactive/temporarily inactive mode. This function is optional.
- Click ‘Check MSISDN status’. Fig 3.3.1-3 will be displayed. Click ‘OK’.
Fig 3.3.1-3
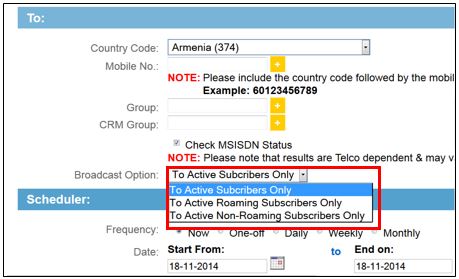
- "Broadcast Option" will also be displayed. Refer to Fig 3.3.1-4.
Fig 3.3.1-4
- Select the "Broadcast Option" type. The definition of each broadcast option is displayed in Table 3.3.1-3.
Table 3.3.1-3
- Note that credits will be deducted for every mobile number ticked.
- You can view the results of "Check MSISDN Status" by referring to Section 2.1.2.3 Network Query Log. Only successful results will be logged in the "Network Query Log". Failed results will be logged in the "Rejected Log".

5. Define Scheduler for sending Frequency: Now, One-Off , Daily, Weekly or Monthly
- Now: Message will be sent immediately.
- One-Off: Message will be sent once only based on the scheduled date and time.
- Daily: Message will be sent repeatedly on a daily basis based on the time specified in the setting.
- Weekly: Message will be sent repeatedly on a weekly basis based on the day specified in the setting.
- Monthly: Message will be sent repeatedly on a monthly basis based on the week and day specified in the setting.
6. Select the “Language” to compose the message.
- Roman characters: English / Bahasa Melayu, etc.
- Unicode characters: Arabic / Simplified Chinese / Traditional Chinese / Japanese / Korean / Gujarat / Thai / Vietnamese, etc.
7. Select “Message Template” or enter new message in the message box.
- Please avoid cutting and pasting of any message from external source.
- Mobile operators in China only accept SMS in Simplified Chinese and Roman Characters.
- Supports Auto Concatenated SMS for all, except in China, Taiwan and Digi in Malaysia.
8. Click "Submit" to confirm the setting, or click “Reset” to clear the input/setting on the current page.
- Confirmation message box is displayed.
- Supports Auto Concatenated SMS: A long message will be merged automatically and combined as one SMS on the receiver's mobile phone.
- Messages longer than 160 characters for Roman characters, 70 characters for Unicode characters will be concatenated.
- The charges and credit deduction and maximum characters allowed are illustrated in Appendix "Concatenation".
Note: For MMS, enter a valid "Subject Title" which is synonymous with the broadcasted project.
- This is an optional field.
- Maximum length: A Maximum of 40 Roman characters (inclusive of space, numeric and special characters) are allowed to be displayed.
- A maximum of 13 Unicode characters are allowed. (inclusive of space, numeric and special characters) are allowed to be displayed.
- Accepted input: Roman and Unicode characters.
Preview Message
- You can preview the message as how it would be displayed on the mobile phone.
- To view, click “Preview” after you have entered the respective fields of your message.
- A Message Terminating (MT)” screen is displayed.
SMS
Fig 3.3.1-5
MMS
Fig 3.3.1-6
Related Links:
- Refer to "Message Template" for message template creation.
- Refer to "Reporting Logs" for transaction status after message is sent.
- Refer to "Event Listing" for scheduled SMS event status or tracks messages sent to group.
3.3.2 Personalized Message
- "CRM group" refers to the group that has been created in CRM Module. This group will be pulled into the Bulk Message Module - Personalized Message when "GRM Group" is selected. Please refer to Section 6.3.3 to understand how to broadcast messages to specific groups of people created in CRM database.
- Please refer to Fig 3.3.2.1-1 for SMS and Figure 3.3.2.1-2 for MMS.
3.3.2.1 Group File / CRM Group
SMS
Fig 3.3.2.1-1
MMS
Fig 3.3.2.1-2
- This is a mandatory field.
- A maximum of 11 alphanumeric characters OR 14 numeric digits are allowed at any one time.
- Please note that there are a few countries that do not support random/dynamic sender ID. They are as shown in Table 3.3.1-1 Please ensure compliance with specific Telco/country regulations when broadcasting messages.
- Space is allowed for alphanumeric format only.
- This is an optional field.
- Maximum input: 50 alphanumeric characters are allowed to be displayed inclusive space.
- Accepted input: Roman and Unicode characters.
- This is an optional field.
- Maximum length: A Maximum of 40 Roman characters (inclusive of space, numeric and special characters) are allowed to be displayed.
- A maximum of 13 Unicode characters are allowed. (inclusive of space, numeric and special characters) are allowed to be displayed.
- Accepted input: Roman and Unicode characters.
- For Group File, it is required to import the external contact file for sending purpose.
- For CRM Group, the system will retrieve the contact information of the selected CRM group. Please refer to Section 6.3.3 to understand how to broadcast messages to specific groups of people created in CRM database.
- System will send the message automatically to the group's contact list.
- You can opt to check the MSISDN status of the mobile number i.e. if the number is active/inactive etc. Please ensure you have enough Network Query credit. Refer to Section 2.1.2.3 Network Query Log to check how to operate the "Check MSISDN Status". Note that only successful results will be logged in the "Network Query Log". Failed results will be logged in the "Rejected Log".
- File must be in ".txt" format
- File Format:
<mobile no.><tab><variable1><tab><variable2>- Maximum upload file size allowed is 2MB. Should you require up to 6MB, please consult your Global Business Consultant.
- The number of variables should be in accordance with the selected Personalized Message Template.
- Template file must be created in advance.
- Now: Message will be sent immediately.
- One-Off: Message will be sent one time only based on the scheduled date and time.
- Daily: Message will be sent repeatedly on a daily basis based on the time specified in the setting.
- Weekly: Message will be sent repeatedly on a weekly basis based on the day specified in the setting.
- Monthly: Message will be sent repeatedly on a monthly basis based on the week and day specified in the setting.
Related Links:
- Refer to Appendix “Personalized Message (File Format)" for example of required personalized file format.
- Refer to "Message Template" for message template creation.
- Refer to "Reporting Logs" for transaction status after message is sent.
- Refer to "Event Listing" for scheduled SMS event status or track message sent to groups.


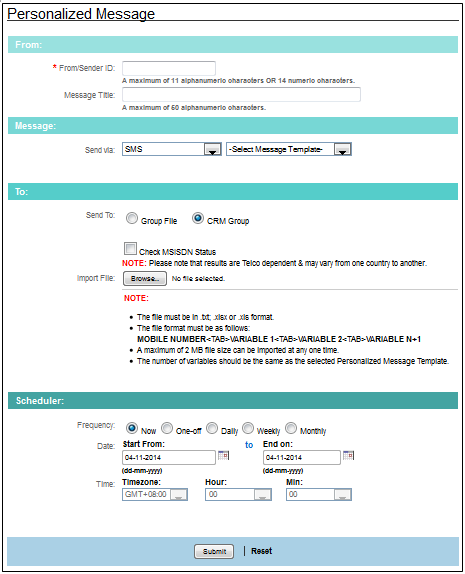
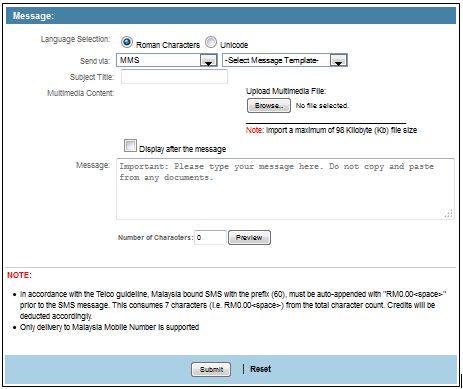
Fig 3.4-1
"Bulk Coverage Price Lookup" is a complete reference list of prices that MES GUI supports.
Fig 3.4-2
You can mouse over the "Price" column to identify the prices of each tier. Class refers to the package that you have signed up for when you purchased the service. The following is the definition of the "Class" column.
Note: NOT all countries have Classes. Please check with your respective Account Managers.

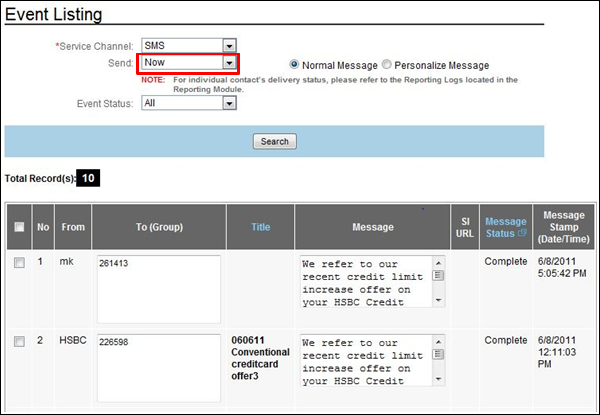
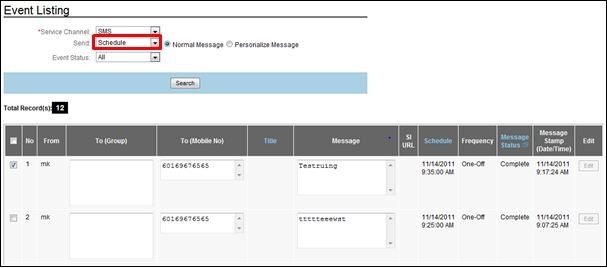
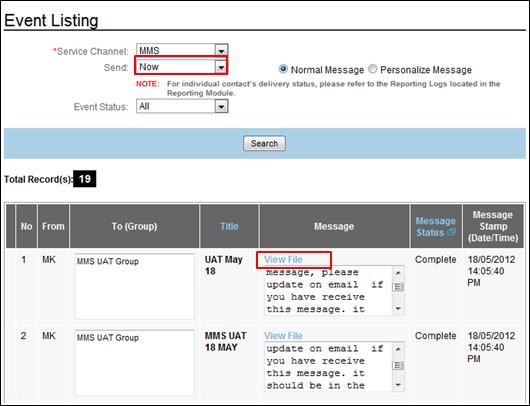
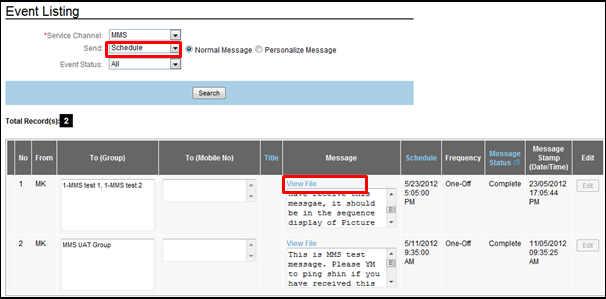
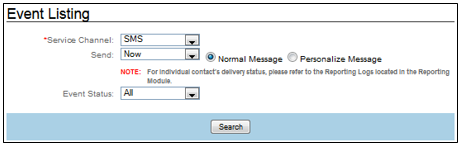
- Scheduled event
- Displays events for individual / group receivers.
- Non-scheduled events (Send Now)
- Displays events for Group receivers.
- For an individual receiver, please refer to "Reporting Log" for message delivery status.
- "Normal Message"
- "Personalized Message"
Fig 3.5-2
3.5.1 Send
- Displays "Normal Messages" that is sent on “Now” or on "Schedule”.
- The Delivery status of group receivers will be reflected in the "Event Listing".
- Delivery status of individual receivers will be reflected in the Reporting Logs immediately. Table 3.5.1-1 shows the Delivery status description.

Delivery Status Description
Status |
Description |
|---|---|
Pending |
This status is only applicable for messages on 'Schedule'. This status shows that the message is still pending before the actual broadcast date and time. |
Processing |
MES GUI is broadcasting messages at the moment. |
Complete |
MES GUI has completed the broadcast. Kindly refer to the reporting log for message delivery status. |
Fail |
MES GUI failed to execute the broadcast. No messages were sent. |
Table 3.5.1-1
- Displays "Personalized Messages" that is sent on “Now” or on "Scheduled".
- Any records with an error format, will be logged inside the error log text file.
- The duplicate Mobile No. checking is not available for "Personalized Message" file during uploading process.
- A successful event sent from the CRM Module will be reflected in both the "Event Listing" and the "Reporting Logs".
2. Personalized
3.5.2 Edit
SMS
Fig 3.5.2-1
Fig 3.5.2-2
MMS
Fig 3.5.2-3
Fig 3.5.2-4
Notes:
- Only scheduled events which are more than 10 minutes away from the intended broadcast time can be edited.
- For events scheduled on a recurring basis, editing is allowed as long as it is more than 10 minutes away from the intended broadcast time. Otherwise, the edit button will be disabled.
- Re-scheduled time must be set later than the current system time.
- Make sure the number of variable for the new message template is the same as the previous.
- You are not allowed to edit the "Personalized Message" type in the receiver group for the same event. Mismatched numbers of variables will result in:
- missing of message information
- failure in delivery
3.5.3 Delete
- Select the check box of the respective event that you want to delete.
- Click “Delete” to remove the event.
Note:
- You are allowed to delete scheduled events which are 3 minutes away from the intended broadcast time.