Mobile Enterprise Services
HELP
Expand All | Retract All

-
"Administrative Module" is a useful tool for Corporates with multiple divisions or resellers, to create several sub-user accounts instantly.
-
The module facilitates the administration of accounts, from Account set-up to Low credit triggers.
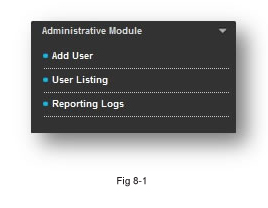

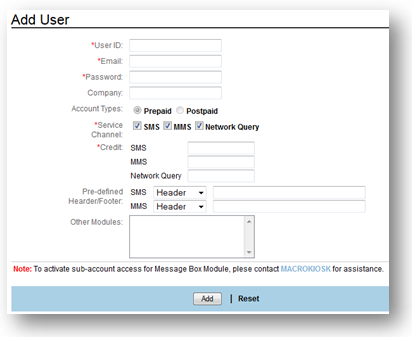
Fig 8.1-1
-
Enter the “User ID” for the new account.
- Maximum length allowed is 30 characters.
- Special characters such as *, - , +, <Space> are not allowed. Only '_',’ ;’, '@' and '.' are allowed.
-
Enter the email.
-
Enter the "Password" for the new account.
- Password is case sensitive.
- The minimum length is 8 characters in alphanumeric format.
-
Enter the “Company” name for the account, if any.
-
Select “Account Type” for the account.
- Prepaid Admin Users are not allowed to create postpaid type sub account.
- Postpaid Admin Users can create a prepaid or postpaid type sub account.
-
Enter the ‘Credit’ limit for SMS, MMS & Network Query.
- This is only applicable for ‘Prepaid’ account.
- Please note that if you tick the ‘SMS’,’MMS’ & ‘Network Query’ Service Channel, you MUST enter the credits in the text box.
- If you want to edit any of the ‘Service Channel’ of your client after you have created their account, just click on the ‘User ID’ column in the ‘User Listing’ module and make the changes.
Note: The credit limit assigned to your client cannot exceed the amount in your account. The total amount displayed in your account can be viewed on the top of the dashboard. Refer to Fig 8.1-2 below:
 Fig 8.1.2
 -
Select "Header" / "Footer" from "SMS Message" drop down list.
- The display message will be highlighted and you may replace the default text with a new message. This message will be included in every message sent from the sub-user account.
- The default text is only for display purpose and will not be displayed as part of the message sent from the sub-users' account.
-
Enter "SMS Message" as a preset tag line, if you intend to display this fixed message along with the SMS broadcast for your sub users' account.
For example: SMS Preset Tag Line is set as "Powered by Macro Kiosk". By default, every SMS broadcasted from the sub-users' account will display "Powered by Macro Kiosk" as a header or footer text.
-
Select “Other Modules” accessible by sub-account (Multi-selection is allowed).
- By default, all sub accounts are assigned with Bulk SMS module access right only.
- "Other Module" is blank if Admin Module do not subscribed to any optional module.
- To select more than one module, click on the control button and perform selection. You will know that the module is selected once it is highlighted.
- Sub-account access for "Message Box" Module will be activated by Macro Kiosk upon approval.
-
Click "Add" to save the setting, or click “Reset” to clear the input/setting on the current page.

Fig 8.2-1
8.2.1 Search
-
Key in User ID or Company name in the search field to search for sub-user account information.
-
Accepted input: Roman / Unicode / Thai characters
8.2.2 Reset Password
- Double click on the ‘User ID’ to edit the details of the user account.
- If the user would like to reset the password, click on the ‘Reset’ button located under the ‘Password’ column.
- A confirmation message will be prompted as below:
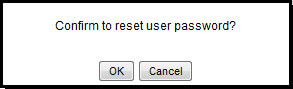
Fig 8.2.2-1
4. When user clicks on ‘OK’ the users password will be automatically generated by the system and emailed to them. After this, the user can change the password to their own preference.
8.2.3 Delete Account
-
If any account needs to be deleted, right click at the check box and click the ‘Delete’ button at the bottom of the list.
8.2.4 Edit
-
Click on the selected ‘User ID’ to edit their details.
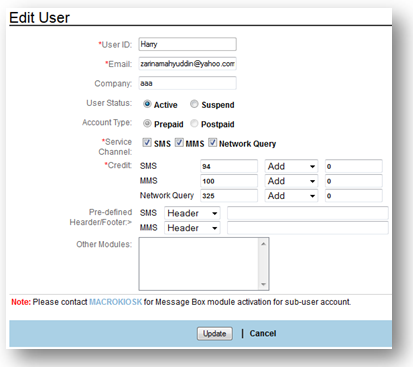
Fig 8.2.4-1
-
Edit the setting for the respective fields.
-
Click "Update" to save the new setting, or click "Cancel" to abort the action.
Edit field |
Description |
User ID |
|
|
|
Company |
|
User Status |
|
Account Type |
|
Service |
|
Credits |
|
Pre-defined Header/Footer |
|
Other Module |
|
Table 8.2.4-1
8.2.4 Export
-
Select “Export All Users" to export the entire user account records into excel (.xls) file.
-
Select "Export Selected Users" to export the selected user account record into excel (.xls) file.
-
This report consists of detailed and summarized SMS & MMS transaction records of your clients with or without ‘Message Title’. The SMS transaction consists of ‘Transaction Log’, ‘Rejected Log’ & ‘Network Query Log’.
8.3.1 Search
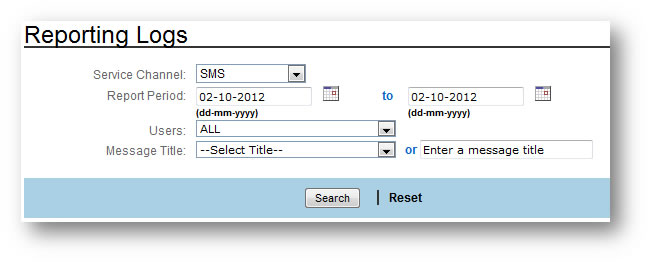
Fig 8.3.1-1
-
Enter the reporting date range, such as Start date and End date.
-
Select “Users” from the drop down list.
-
Select the “Message title” from the drop down list,or enter a keyword.
-
Click "Search", or click “Reset” to clear the input/setting on the current page and the “Total Reporting Logs” is displayed.
SMS
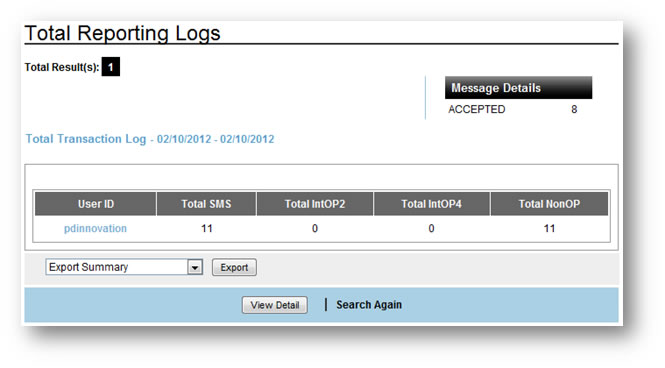
Fig 8.3.1-2
MMS

Fig 8.3.1-3
-
Click the respective "User ID" or "Message Title" to view the details of the user.
Details of the reporting logs:
- Total Intop2
- 2 credits will be deducted for each SMS sent to countries listed under this category (for Prepaid).
- Total Intop4
- 4 credits will be deducted for each SMS sent to countries listed under this category (for Prepaid).
- Total NonOp
- The standard credit deduction applies for countries listed under this category.
Network Query
Please refer to Section 2.1.2.5 Network Query Log under Reporting Log module. The same details will be populated here.
8.3.2 View Details
SMS
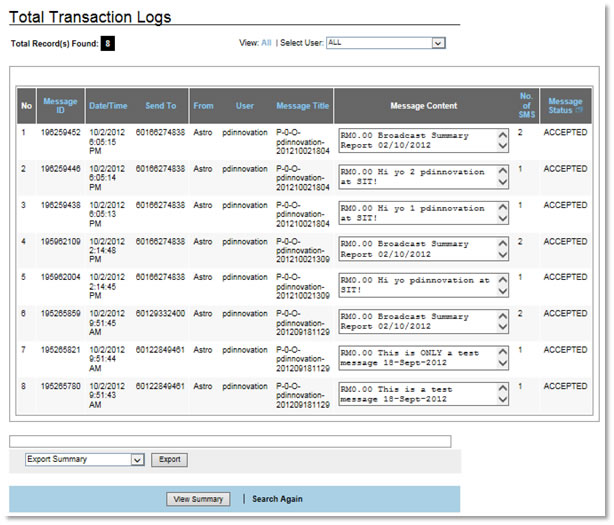
Fig 8.3.2-1
MMS
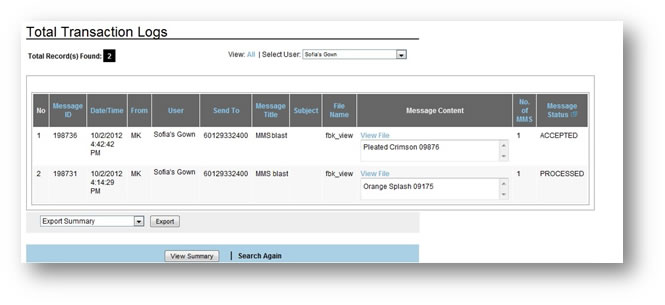
Fig 8.3.2-2
8.3.3 View Summary
1. When 'View Summary' is clicked, it will display the details of transactions.
8.3.4 Export
1. Select ‘Export Summary’ or ‘Export All Details’ from the drop down list.
2.User can select to either ‘Open’ or ‘Save’ the file.
SMS
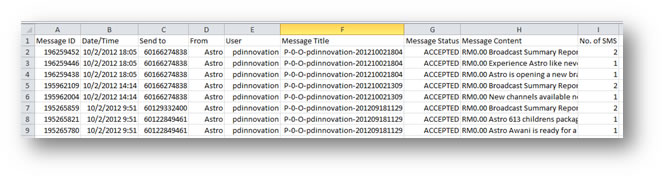
Fig 8.3.4-1
MMS
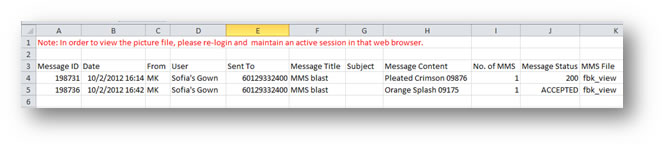
Fig 8.3.4-2
-
For the MMS ‘Export All Details’, users can click on the ‘MMS File’ column to view the picture/video etc. When a specific file is clicked, the MES GUI homepage will be triggered. Users have to login the MES GUI browser to view the MMS file.
-
Please note that to continue viewing the file, user has to stay active in the MES GUI web browser.

