Mobile Enterprise Services
HELP
Expand All | Retract All

Customer Relationship Management (CRM) Module is a data mining module that allows you to further analyze the customer profile based on preferred demographics.
CRM Module consists of the following sub modules:
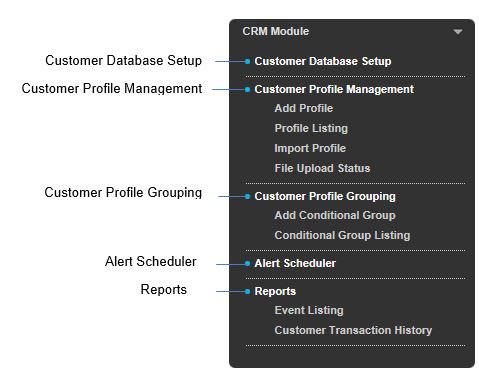
Fig 6-1

- To setup the customer database.
- A maximum of 5 databases are allowed.
6.1.1 Create Database
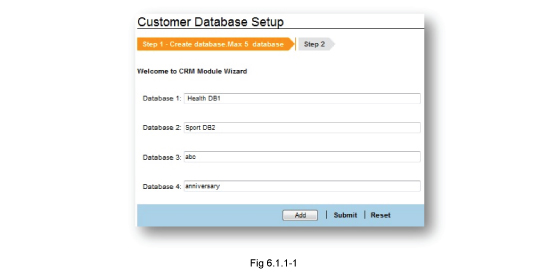
- Enter the database names into the respective fields. You may create up to a maximum of 5 databases.
- Click “Add”, then press Enter.
6.1.2 Setup Database
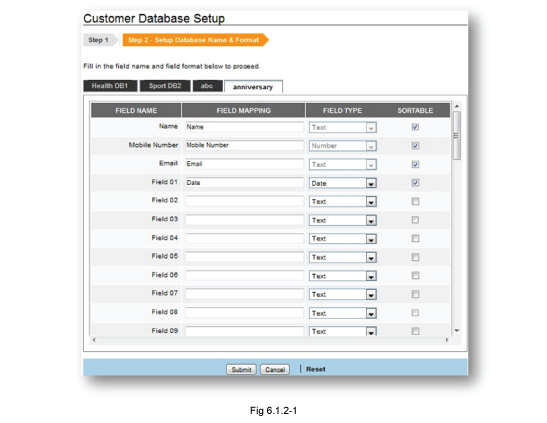
- Enter the Name, Mobile No, and Email into respective fields.
- Name, Mobile Number and Email are the default setting fields.
- Name and Email are optional.
- Email must be in the format of username@domain.com
- Name, Mobile Number and Email are the default setting fields.
- Maximum 50 configurable fields are allowed for each database.
- Select the Sortable check box to enable the sortable fields.
- Available field types are text, numeric and date.
Text : Maximum 50 characters, in Roman / Unicode characters
Numeric : Maximum 50 characters
Date format : DD-MM-YYYY
- Click "Submit" to save the setting, or click “Reset” to clear the input/setting on the current page.
- "Customer Profile Management" allows you to add or import the customer profile into the pre-set database.
- You may set up an individual customer profile or import a group of profiles from external database.
6.2.1 Add Profile
- "Add Profile" allows you to add an individual customer profile for the selected database.
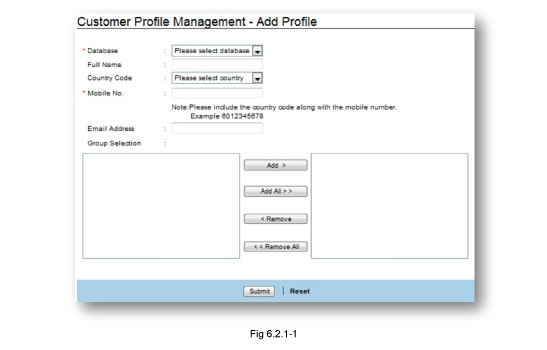
- Enter a Name and Mobile No. for the profile.
- This is a mandatory field.
- Accepted input: Roman and Unicode characters.
- Click "Add" to add another database setup.
- "Add" button becomes dim when user account has reached the maximum of subscribed databases.
- Click "Submit" to confirm, or click “Reset” to clear the input/setting on the current page.
Notes:
- Profile setup page is displayed based on the selected database.
- Mobile Number is a mandatory field.
- Only configured field will be displayed on the setup page.
6.2.2 Profile Listing
- "Profile Listing" allows you to view the available customer profile of the database.
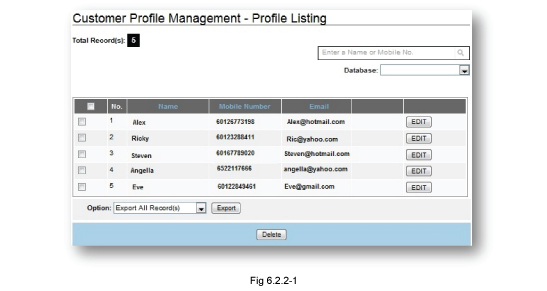
Search
- Enter the customer Name or Mobile No. into the search field.
- Click search icon to search for the individual profile.
Export
- Select “Export All Records” or “Export Selected Record”.
- Click “Export” to export the profiles into the excel file.
Delete
- Select the check box of the respective profile you want to delete.
- Click “Delete” to delete the selected profile.
6.2.3 Import Profile
- You may import a list of customer profiles into a database from an external file.
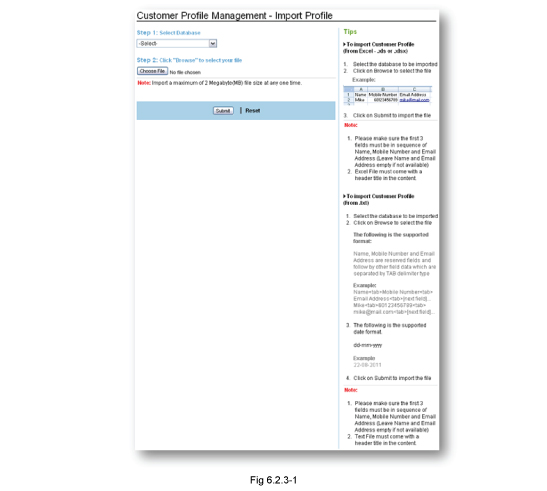
- Select the database to be assigned for imported profiles.
- Supported file types are:
- Text (.txt)
- Excel 2003 (.xls)
- Excel 2007(.xlsx).
- The first three fields are reserved for Name, Mobile Number and Email respectively.
- System will remove any duplication of mobile numbers in the imported file automatically.
- Click "Browse" to locate your file.
- Import a maximum of 2 Megabyte (MB) file size at any one time.
- Text or Excel file must come with a header title in the content.
- Supported date format is:
- dd-mm-yyyy
- Click "Submit" to confirm and upload the file into the selected database,or click “Reset” to clear the input/setting on the current page.
- Allows upload of Unicode text file naming into the CRM module.
File Upload Status
"File Upload Status" displays the upload status of each imported file.
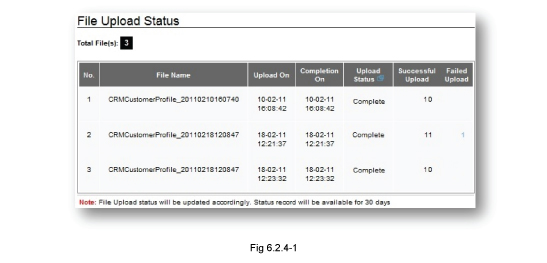
Updating
Indicates that the file upload is in progress.
Complete
Indicates that the file has been uploaded successfully. The total successful records and unsuccessful records will be displayed. Click the link of "Failed Upload" to view unsuccessful upload records.
Fail
Indicates that the file has failed to upload. You are required to re-upload the file.
- To group the customer profile based on preferred demographics or common interests.
6.3.1 Add Conditional Group
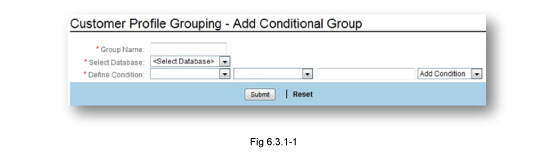
- "Add Conditional Group" allows you to group the customer profile with similar characteristics.
- The grouping will be updated based on the matching field type criteria.
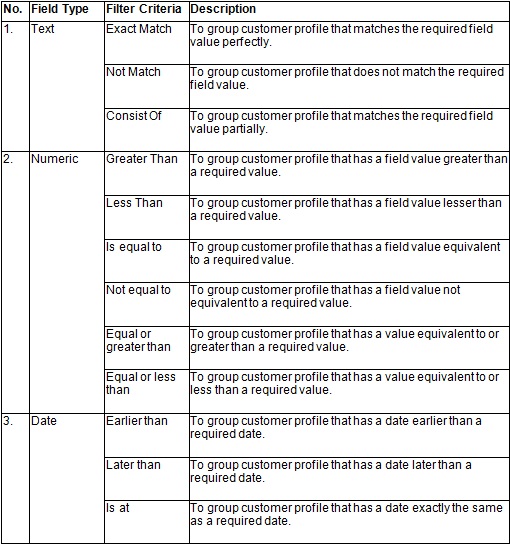
Table 6.3.1-1
- Enter a "Group Name".
- This is a mandatory field.
- "Group Name" is uniquely created.
- Accepted input: Roman and Unicode characters
- Select the database to be grouped.
- Available data field in the list will be grouped automatically.
- Select the filter criteria from the field accordingly.
- The filter criteria will be grouped automatically based on the selected field type.
- Enter the required value to be filtered if the selected field type is text or numeric. Or, select the required date format to be filtered with one of the combination below:
- DD-MM-YYYY
- MM-YYYY
- YYYY
- MM
- DD
- DD-MM
- A maximum of two conditions are allowed for each group, either OR or AND.
- OR means the condition must match at least one of the criteria.
- AND means the condition must match both criteria.
- Click "Submit" to save the setting, or click “Reset” to clear the input/setting on the current page.
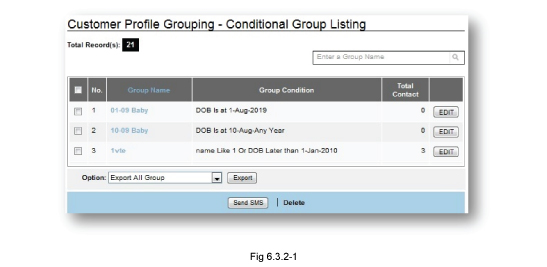
6.3.2 Conditional Group Listing
- The customer's profile detail for the conditional group is shown below.
Search
- Enter a particular group record in the search field.
- Click the search icon to look for the matching record.
- The system will continue to search for the matching record from the database unless the record has been removed.
View
- Click a group in "Group Name" to view the detail customer profile which belongs to the group.
Edit
- Select the check box of the respective group you want to edit.
- Click "Edit" to perform the editing.
- The records that match the previous condition(s) will still remain in the group unless it has been removed.
6.3.3 Broadcast Personalized Messages to Specific Groups of People created in CRM Database
Please note that in order to Broadcast Messages to selected recipients by age, name, mobile number etc., you have to follow the steps below:
1. First create a CRM database with the specific fields such as Age, Mobile Number, E-mail, Training Batch, Car Owned etc. Give a name to the CRM database.
2. After creating this database, go to Bulk Messaging Module "Create Template".
3. Select either SMS or MMS. Then select the Template Type as "Personalized". Next select "CRM".
4. Chose the database that you had created in CRM earlier. Type the text message in the "Message" box and include the necessary fields that you want in your text message. You can choose the fields by clicking on the area highlighted in red below (Fig 6.3.3-1).
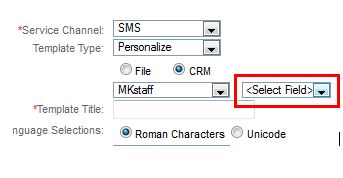
Fig 6.3.3-1
5. When this is completed go to Bulk Message Module - Personalized Message. Fill in the necessary items in "From" column.
6. In the "Message" column, select the desired Service Channel. In the "Select Message Template" drop down box, choose the CRM template that you had created earlier.
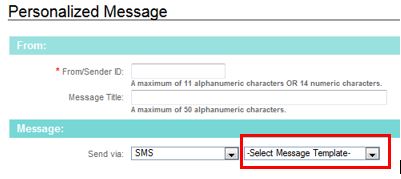
Fig 6.3.3-2
7. This will immediately display the template that you had created earlier in "Create Template".
8. Now go to the "To" column and select "CRM Group" radio button. Next click the drop down button and select the specific "Conditional Group" that you would like to broadcast your message to.The list in this "Select Group" (as shown in Fig 6.3.2-3) will display the full list of the " Group Conditional Listing".
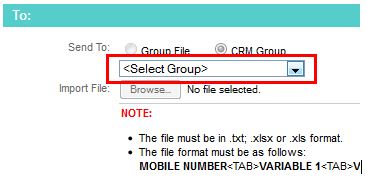
Fig 6.3.2-3
9. Once completed, you can either choose to broadcast the message on "Schedule" or "Now". .
10. Finally click "Submit".
- To broadcast messages to the targeted customers in Conditional Group via SMS, MMS or Email.
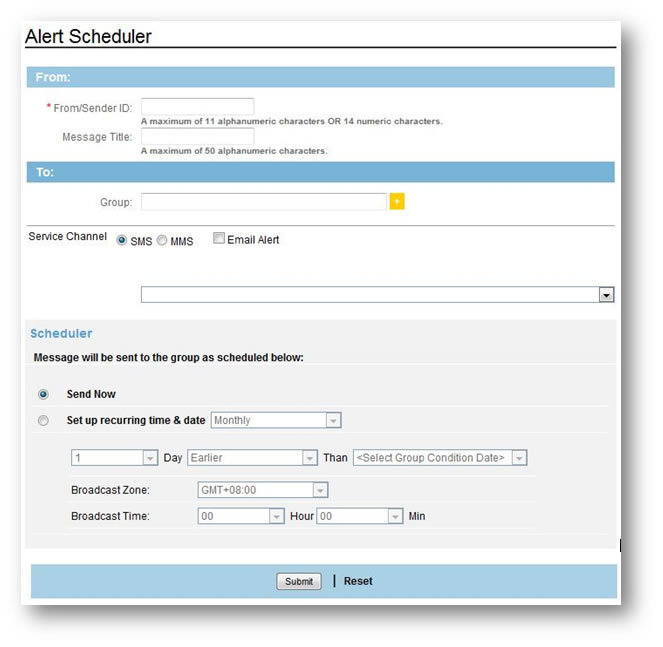 Fig 6.4-1 Alert Scheduler for SMS
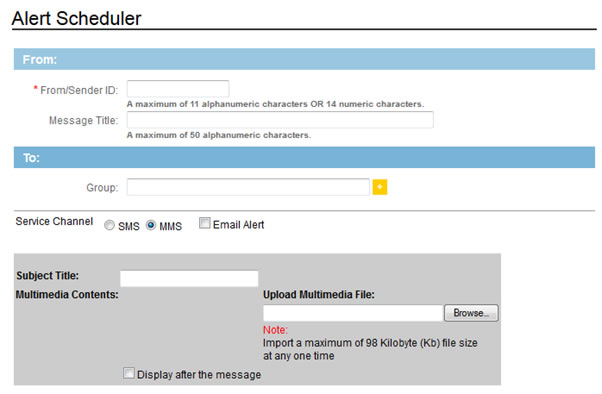
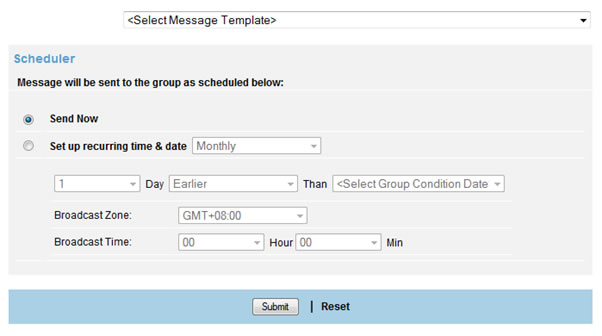 Fig 6.4-2 Alert Scheduler for MMS
- Enter the "Sender ID" that represent your corporate/marketing branding name inside the "From/Sender ID" field.
- This is a mandatory field.
- A maximum of 11 characters for alphanumeric or 14 digits numeric characters are allowed.
- A maximum of 11 alphanumeric characters or 14 numeric digits are allowed. Please ensure compliance with relevant Telco/Country regulations as specified in "Bulk Message Module Table 3.3.1-1."
- Space is only allowed for alphanumeric formats.
- Enter a message title that can be used to track a reporting log or leave the field blank if no applicable message title.
- A maximum of 50 alphanumeric characters are allowed to be displayed inclusive space.
- If you select MMS, Fig 6.4-2: MMS Alert Scheduler will be displayed. Here, you will see the Subject Title and the Upload Multimedia File. For Subject Title, the following is suported:
- Maximum length: A Maximum of 40 Roman characters (inclusive of space, numeric and special characters) are allowed to be displayed.
- A maximum of 13 Unicode characters are allowed. (inclusive of space, numeric and special characters) are allowed to be displayed.
- Accepted input: Roman and Unicode characters.
- Define recipients for Conditional Group.
- To select recipient from the Conditional Group List (Multi group selection is NOT allowed).
- Enable the "Email Alert" feature if the message is required to be sent via email.
- The CRM Module relies on third party email server for sending the email. Thus the accurate third party SMTP server configuration setting is required for connection purpose.
- No reporting shall be provided for email delivery from CRM Module. You are required to refer to the connected SMTP server log for this reporting.
- Message sent via email is similar to message sent via SMS.
- Enter the "Sender Email Address" and "Email Title".
- "Sender Email Address" is similar to "Username" setting in SMTP authentication Setup.
- Select the message template from the list.
- The message template must be composed from the "Bulk Message Module" > "Create Template" > "Personalized (CRM) Type."
- Define "Send Frequency."
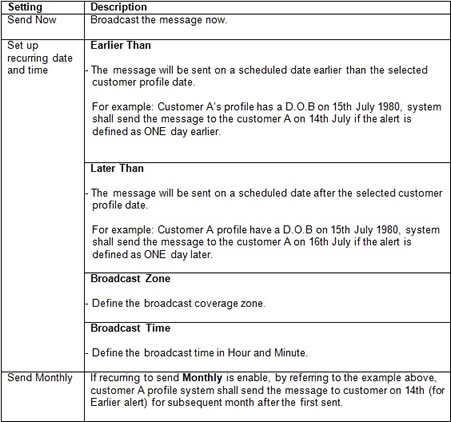
- Click "Submit" to save the setting and send the message, or click “Reset” to clear the input/setting on the current page.
- Confirmation message box is displayed to verify the action.
Note:
- For Malaysia, the network operators will append a price indication of RM0.00<space> automatically at the beginning of each message. This price indication is a mandatory requirement and will consume a total of 7 characters from each message sent.
Related Link:
Refer to Appendix "Variation - Malaysia" for references on credit deduction with auto price code appended.
- 'Reports' allows you to view the summary of the scheduled broadcast event and customer transaction history.
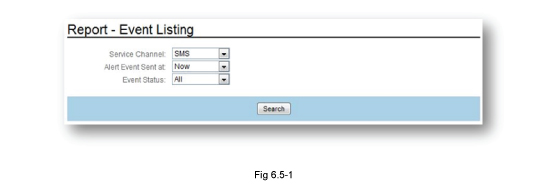
6.5.1 Event Listing
-
"Event Listing" displays all the scheduled event and provides further reference on execution status of each event.
- The following are the types of Event Status & it's descriptions.
Status |
Description |
|---|---|
Pending |
This status is only applicable for messages on 'Schedule'. This status shows that the message is still pending before the actual broadcast date & time. |
Processing |
MES GUI is broadcasting messages at the moment. |
Complete |
MES GUI has completed the broadcast. Kindly refer to the reporting log for message delivery status. |
Fail |
MES GUI failed to execute the broadcast. No messages were sent. |
Terminated |
Broadcast event has been cancelled. No messages were sent. |
Table 6.5.1-1
"Now" Event List
- The log is filtered by SMS sent as "Now."
Fig 6.5.1-1
"Schedule" Event List
- This log is filtered by SMS sent on Schedule. "Terminate" is allowed for the "Schedule" type of event, whereby the system will not send any message to the pending contacts in the list.
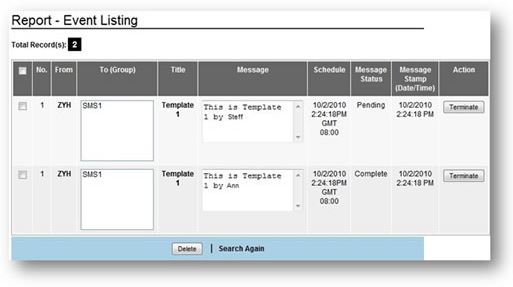
Fig 6.5.1-2
6.5.2 Customer Transaction History
-
Customer Transaction History displays the summary of the transactions.
![]()
Search
-
Select the report period within the same month and click “Search” to display the Customer Transaction History.
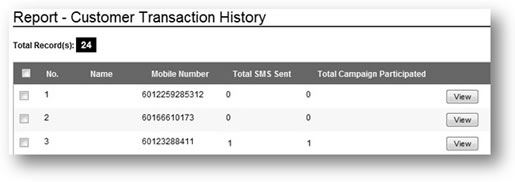
Fig 6.5.2-2
View
-
Click “View” to display the respective "Customer Transaction History Detail."
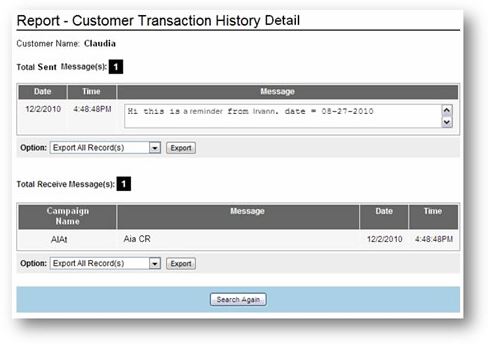
Fig 6.5.2-3
- The history report displays the past and precent records belonging to individual customers which have been grouped in the "Total message sent from merchant (MT record)" and "Total message received from the customer (MO record)".
- The MO record will only be available if the CRM Module is integrated with the Message Box Module. Refer to “Campaign Creation (with CRM Module Integration)”.
- The MO record log for Singapore Message Box Module shall be updated ONE day after the transaction is carried out.
Export
- Select “Export Summary”, “Export All Details”, or “Export Broadcast Summary” from the drop down list.
- Locate your file in your local hard drive to save the customer transaction.
Related Link:
- Refer to “Campaign Creation” for further details.
- Refer to “Campaign Creation (with CRM Module Integration)” for further details.

